Sunday, February 13, 2022

Functions triggers and bindings

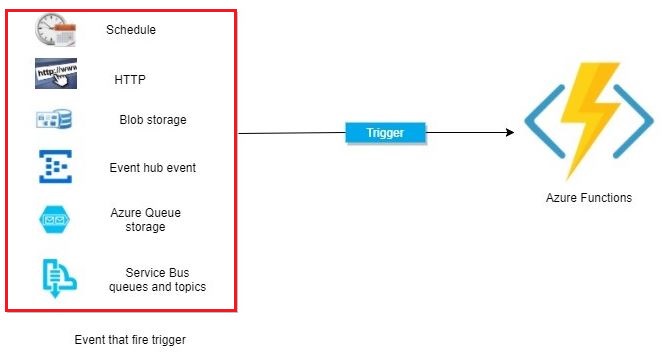
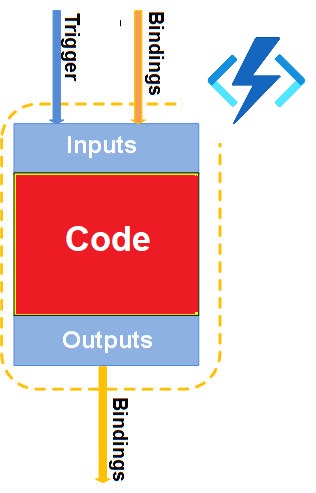
 Triggers are what cause a function to run. A trigger defines how a function is invoked and a function must have exactly one trigger. Triggers have associated data, which is often provided as the payload of the function.


Binding to a function is a way of declaratively connecting another resource to the function; bindings may be connected as input bindings, output bindings, or both. Data from bindings are provided to the function as parameters. All triggers and bindings have a direction property in the function.json file

  1. For triggers, the direction is always in
  2. Input and output bindings use in and out
  3. Some bindings support a special direction input. If you use input, only the Advanced editor is available via the Integrate tab in the portal

Triggers and bindings let you avoid hardcoding access to other services. 


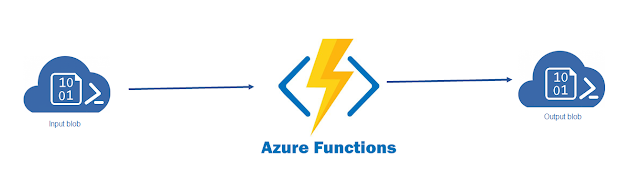
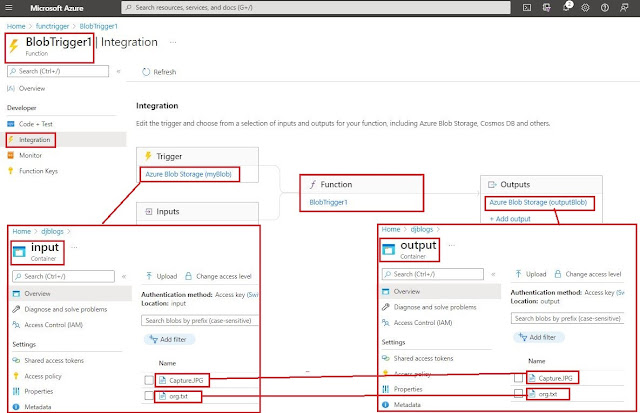
In the above screenshot, we are copying a newly uploaded file in the blob input container to the same blob output container with help of the azure function 


If you want to learn more about the azure function then read my previous blog about Azure Function

Azure Function in Azure portal

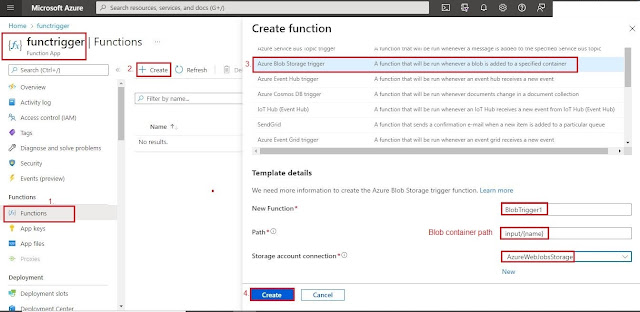
We will create an azure function with help of the Azure portal. In this demo, we will create 2 containers inside the blob

1.       Input

2.       Output

When the user will upload any file in the input container blob it will copy to the output container blob with help of the azure function binding feature without any code.  

Need to follow the below steps

1.       Go to the Azure portal (https://portal.azure.com/)

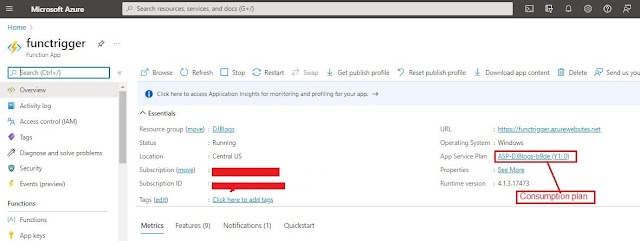
2.       I have created an Azure Function with a consumption plan which will be hosted in djblogs storage account. If you want to learn more about the azure function, please my previous blog

about AzureStorage Account.


3.       Add new function “BlobTrigger1” in the newly created function app. We will use Azure blob trigger to invoke this function.


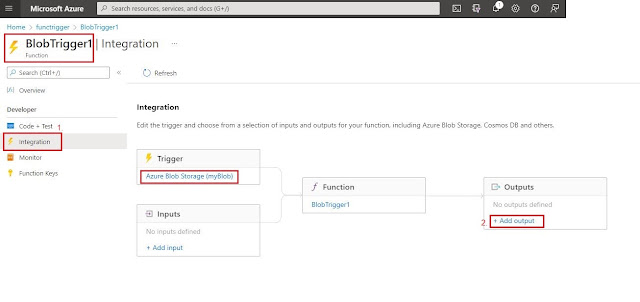
4.       Once the function is created, we can add output in function on the azure portal and click in the integration link below


5.       In this demo we will show how to copy any file which will be uploaded in blob input container with help of the azure function to the same blob output container.


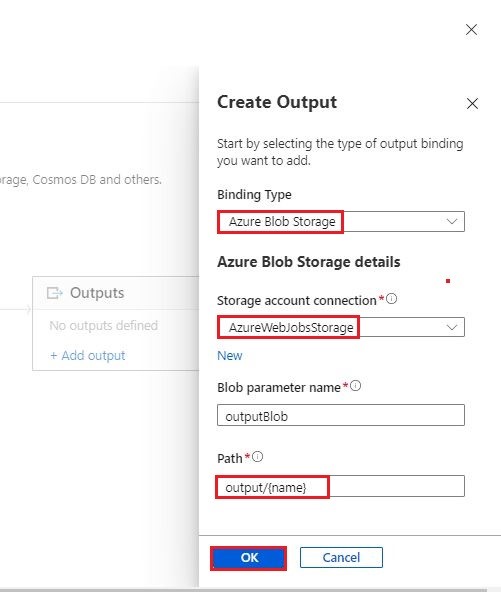
6.       Once the output is added then we click on the integration link inside the azure function it will display a link this


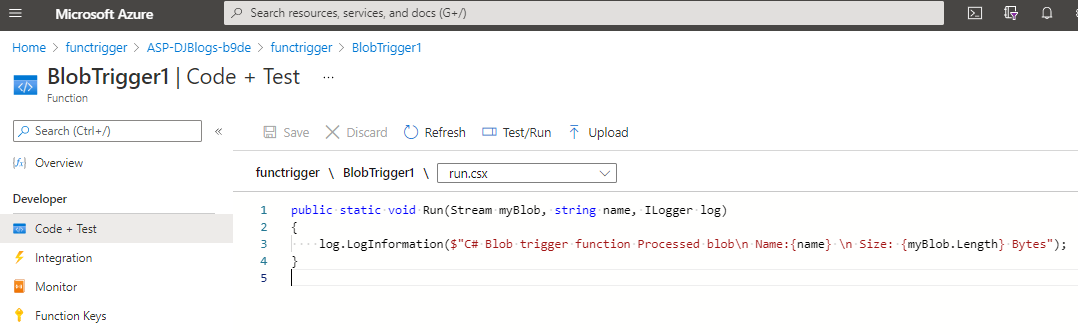
7.       If we want to see the azure function code, then need to click on the Code +Test link

Function code as below

Run.csx

No code change in this file
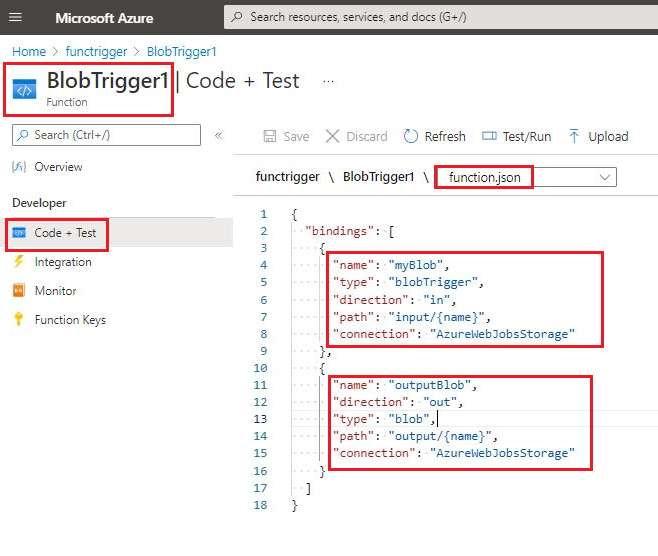
Function.json

Azure function all binding defined inside function.json file, so we can see the binding which we have defined

Hope it will help you to give a little understanding of the azure function trigger and binding

Keep sharing keep learning. Cheers  

Saturday, October 16, 2021

Web App with Azure Active directory Authentication

This article shows you how to configure authentication for Web application so that your app signs in users with the Microsoft Identity Platform (Azure AD) as the authentication provider.

In this blog we will create web application in .net core with azure active directory authentication.

We need to follow below steps

1.       App registration for azure active directory authentication

2.       Once registration done then get follow information from app registration

a.       Domain (tenant.onmicrosoft.com)

b.       TenantId

c.       ClientId (Application ID)

3.       Create web application in .net core with Microsoft identity platform authentication type  

4.       Set Domain, TenantId and ClientId in your web app appsettings. json

5.       Add redirect URL for registered app  

6.       Run the application and it will authenticate with Azure Active directory

App registration for azure active directory authentication

When we want to authenticate our application with azure active directory, first we need to register app in our azure active directory. I have written in previous blog, how we can register app with help of azure portal. If you have not known about it. Please read that post. I will use same app registration (HRApp) for azure active directory authentication.

What is Azure service principal? link

In this post I have created app with name HRApp. Now I will use same app for authentication.


Create App Web in .net core

Once app is registered after that we can use that in our web application for authentication purpose. You need to follow simple steps for it.

1.       Open visual studio 2019

2.       Creating ASP.NET Core Web App with name HRApp for demo purpose


3.       Once new project name is given then click on next. It will ask for the .net core framework and authentication type. I have selected as below


4.       Once all selected as above click on create button. It will create web application for you.

5.       Project is created now you can open appsettings. json and some default values setted for Domain, TenantId and ClientId


6.       We need to replace these values with our app registration values like below screen


Add redirect URL in registered app 

Once all values updated, we need to get the .net web application url and add that url in app registration redirect url. In my case application URL is https://localhost:44381. I have followed below steps for it

1.       Go to azure portal https://portal.azure.com/

2.       Once login in portal go to azure active directory and select your tenant where your app was registered

3.       Go to App registrations and selected your app (HRApp)


4.       Click on Authentication and Add a platform for configurations. I have selected Web.


5.       Once web is selected then need to put redirect URL and checkbox checked

a.       Redirect URIs:  https://localhost:44381/signin-oidc

b.       Checked checkbox:  ID tokens (used for implicit and hybrid flows)


6.       Click on configure it will show like below. You can add multiple Redirect URIs


Run the application

Now all set now, we can run our application in visual studio 2019. When we run it will do below things?

1.       Run the application and it will redirect us to Microsoft login screen 


2.       Enter your email id and password and click on Sign in

3.       If sign in successful it will ask for your consent


4.       Click on accept button. It will open web application with active directory authentication


Hope it will help you to implement active directory authentication in your web application.

Keep sharing keep learning  

Sunday, August 22, 2021

Azure service principal

An Azure Active Directory (Azure AD) service principal is the local representation of an application object in a single tenant or directory. ‎It functions as the identity of the application instance. Service principals define who can access the application, and what resources the application can access. A service principal is created in each tenant where the application is used and references the globally unique application object. The tenant secures the service principal’s sign in and access to resources.


A multi-tenant application is homed in a single-tenant (home tenant) and is designed to have instances in other tenants. Most software-as-a-service (SaaS) applications are designed for multi-tenancy. Use service principals to ensure the right security posture for the application and its users in both single-tenant and multi-tenant use cases.

Application registration

When you register your application with Azure AD, you're creating an identity configuration for your application that allows it to integrate with Azure AD. When you register an app in the Azure portal, you choose whether it's a single-tenant (only accessible in your tenant) or multi-tenant (accessible in other tenants) and can optionally set a redirect URI (where the access token is sent to).

When you've completed the app registration, you have a globally unique instance of the app (the application object) which lives within your home tenant or directory. You also have a globally unique ID for your app (the app or client ID).


If you register an application in the portal, an application object, as well as a service principal object, are automatically created in your home tenant.


Application object

An Azure AD application is defined by its one and only application object, which resides in the Azure AD tenant where the application was registered (known as the application's "home" tenant). An application object is used as a template or blueprint to create one or more service principal objects. A service principal is created in every tenant where the application is used.

The application object describes three aspects of an application.

1.       How the service can issue tokens in order to access the application.

2.       Resources that the application might need to access.

3.       The actions that the application can take.


Application Id

ApplicationId will be same for single application object that represents this application as well as it will be same for all service principals created for this application.


Object Id

ObjectId will be a unique value for application object and each of the service principal. This uniquely identifies the object in Azure AD.

Service principal object

To access resources that are secured by an Azure AD tenant, the entity that requires access must be represented by a security principal. This requirement is true for both users (user principal) and applications (service principal). The security principal defines the access policy and permissions for the user/application in the Azure AD tenant. This enables core features such as authentication of the user/application during sign-in, and authorization during resource access.

There are three types of service principal

1.       Application- The type of service principal is the local representation, or application instance, of a global application object in a single tenant or directory.

2.       Managed identity- This type of service principal is used to represent a managed identity. It is used for “linking” a Service Principal security object to an Azure Resource like a Virtual Machine, Web App, Logic App or similar. If you want to learn more about it, you can read my previous blog.

3.       Legacy- This type of service principal represents a legacy app, which is an app created before app registrations were introduced or an app created through legacy experiences.


Hope it will help you to understand service principle and in a future blog, we will use them

Keep sharing keep learning 

Wednesday, July 21, 2021

Authenticate Azure Functions with Swagger UI

 In this blog, we will see how we can secure our azure functions with API Keys and use swagger for API documentation. Swagger is an Interface Description Language for describing RESTful APIs expressed using JSON. If you want to learn more about azure function. Please look into my previous blog (link) about azure function to create rest serverless api .

There are multiple ways to secure your Azure Functions like API Keys, API Management, App Service Authentication (App registration in active directory), etc. If you want to make a start with minimal effort and less setup of Infrastructure, then API Keys is the ideal choice.

Azure Functions allows you to secure HTTP-triggered functions by API access key in the request. We can send HTTP request with help of Swagger, Postman, JavaScript etc.  As part of creating new Azure Functions, we can select the Authorization Level enum value.

Azure Functions with Swagger UI

I am creating new project in visual studio 2019 to demonstrate. How we can add swagger ui in azure function. We need follow below steps.

1.       Open visual studio 2019 and create new azure function project with name FunctionApp.Swagger


2.       Choose option as above screen. If you want to add swagger UI in API make sure you have selected Http Trigger with OpenAPI option.  

3.       In this project we are using Function level Authorization. When we set Authorization level then need to pass authentication token to access the resource. We will pass API key as authentication token with HTTP request       

4.       Once all information filled as above then we will click on create button. It will create Function1  as below

5.       If we run the azure function with help of Visual studio 2019. It will open console window with swagger ui url as above screen. In my case azure function swagger UI is http://localhost:7071/api/swagger/ui

6.       If we open the swagger ui url in browser it will display like this and we can make HTTP request

7.       When we run application in localhost, we don’t need to pass API key in Swagger UI. It will execute our HTTP request without it. Once we deploy the application in Azure then need to pass API key by clicking on Authorize


8.        You can see swagger UI added in our API and we can make HTTP request directly from browser with help of swagger

9.       Now we ready to deploy application Azure.

Consume Azure Function  

Once our application tested in local machine then we need to deploy it on Azure. I have created new azure function (djblogsfuncappwithswagger) in Azure with help of portal. Once azure function created in azure then we need to download the publish profile and publish our code directly from visual studio 2019.

Need to follow below steps to publish azure function in Azure

1.       Created new azure function (djblogsfuncappwithswagger) with consumption app service plan in portal

2.       Once azure function created then need to download publish profile to publish azure function code from visual studio 2019 as below

3.       Once azure function published in Azure then we can make HTTP request with help of swagger UI.

URL: https://djblogsfuncappwithswagger.azurewebsites.net/api/swagger/ui

4.       When we run API in browser without API Key it will give this Unauthorized error

401 Error: Unauthorized


5.       We can get API key from Azure function. Need to open azure portal and go to azure function there is default API key. This is created by default when azure function created.  If you want you can create multiple keys as per our requirement  


6.       We will copy the default key from functions keys and add that key in swagger authorize as below screen. 


7.       Once key added in Swagger UI Authorize and then we try to make HTTP request. It will be executed with HTTP code 200.  

8.       We can make the HTTP request from Postman as well by adding x-functions-key in HTTP request header like below screen shot.

9.       Same way we can make request from JavaScript and jQuery as well.

GitHub Link: https://github.com/deepakjoshiinfo/FunctionApp.Swagger/blob/master/WebApp/Pages/Index.cshtml

I have uploaded code in GitHub. You can download code from there

GitHub: https://github.com/deepakjoshiinfo/FunctionApp.Swagger

Hope it will help you give little idea about authorization and authentication of Azure functions

Keep sharing keep learning. Cheers

Wednesday, July 14, 2021

What is bicep in azure?

Bicep is a Domain Specific Language (DSL) for deploying Azure infrastructure (resources) declaratively. Bicep code is transpiled to standard ARM Template JSON files (Infrastructure as code file), which effectively treats the ARM Template as an Intermediate Language (IL). Bicep provides concise syntax, reliable type safety, and support for code reuse. We believe Bicep offers the best authoring experience for your Azure infrastructure as code solutions.

You can use Bicep instead of JSON to develop your Azure Resource Manager templates (ARM templates). The JSON syntax to create an ARM template can be verbose and require complicated expressions. Bicep syntax reduces that complexity and improves the development experience. Bicep is a transparent abstraction over ARM template JSON and doesn't lose any of the JSON template capabilities. During deployment, Bicep CLI transpiles a Bicep file into ARM template JSON.


Create Azure Resource (Infrastructure) in Visual studio code

We will create azure resource inside visual studio code with help of Bicep. Need to follow below steps.

1.       Install visual studio code below URL

https://code.visualstudio.com/download

2.       Once visual studio code is installed then need to add Bicep extension like below


3.       After installing Bicep then code IntelliSense will come in VS Code for azure resources. Now open to the folder from VS code file menu, where you want to create Bicep project and add new file name (main.bicep)   


4.       We will write code for azure storage account (infrastructure) inside bicep file like below. I have also mapped bicep code with azure storage account resource for better understanding.


Sample code:

resource stg 'Microsoft.Storage/storageAccounts@2019-06-01'={
  name'bicepstoarge'
  location'eastus'
  kind:'Storage'
  sku:{
      name:'Premium_LRS'
  }
}

5.       Once code if written for azure resource (infrastructure) then build the code it will convert bicep file into ARM template JSON.

6.       To build the bicep file we need to run Bicep CLI in visual studio code terminal as below

Manual with PowerShell

https://docs.microsoft.com/en-us/azure/azure-resource-manager/bicep/install#install-manually


# Create the install folder

$installPath = "$env:USERPROFILE\.bicep"

$installDir = New-Item -ItemType Directory -Path $installPath -Force

$installDir.Attributes += 'Hidden'

# Fetch the latest Bicep CLI binary

(New-Object Net.WebClient).DownloadFile("https://github.com/Azure/bicep/releases/latest/download/bicep-win-x64.exe", "$installPath\bicep.exe")

# Add bicep to your PATH

$currentPath = (Get-Item -path "HKCU:\Environment" ).GetValue('Path', '', 'DoNotExpandEnvironmentNames')

if (-not $currentPath.Contains("%USERPROFILE%\.bicep")) { setx PATH ($currentPath + ";%USERPROFILE%\.bicep") }

if (-not $env:path.Contains($installPath)) { $env:path += ";$installPath" }

# Verify you can now access the 'bicep' command.

bicep --help

# Done!


7.       Once Bicep CLI is installed, now build the bicep file below command

bicep build main.bicep    


8.       After build new JSON file (main.json) will created in visual studio code. It is ARM (Azure Resource Manager) template which we will deploy with help of Azure CLI.

9.       Once ARM templated (JSON) is created now we will deploy this resource in Azure with help of Azure CLI.

Deploy resources with ARM templates and Azure CLI

We will see how to use Azure CLI with Azure Resource Manager templates (ARM templates) to deploy your resources to Azure.

To deploy ARM template, install the latest version of the Azure CLI.

URL: https://docs.microsoft.com/en-us/cli/azure/install-azure-cli

Deploy resource in Azure need to follow these steps

1.       Run az login to create a connection with Azure


2.       It will open azure portal login screen. We need to put our azure loginid and password.


3.       Once login done successfully then need to select the subscription, where you want to deploy your resource.

az account set --subscription "<Your Subscription name>"


4.       Once subscription is selected then we ready to deploy our ARM template (JSON) on azure. We will do that with below command

az deployment group create --resource-group DJBlogs --template-file main.json


5.       Once above command is executed successfully then resource will be created in Azure


Hope it will help you to give little idea about bicep and ARM template and We can use all these to put our application infrastructure in code repository and automate our infrastructure.

Keep sharing keep learning. Cheers